This is a follow up post to my latest Techdays session where I, among other things, showed a draft for a Powershell script enabling user to defer themselves using the MyApps page and self-service group management. Now the first version of the script is done (however I would like to call it version 0.1 today :)) and I’ve also written two additional scripts to get the environment up and running as ease the Windows Servicing lifecycle a bit.
In this blogpost I’ll explain what the scripts do, how to run them and also how to set up Azure Automation to enable a continuous process of them. Today you need to do a bit of configuration hands-on, but hopefully the Powershell support for Intune (using the Microsoft Graph) will enable this configuration shortly.
I’ll also include a brief roadmap for each script – and I do welcome feedback and your thoughts on them. The plan is also to create a similar solution for Configuration Manager (SCCM) where the extended possibilities will be much appreciated.
You can find the scripts in this post on GitHub: Intune WaaS Management
Create groups and rings
So, let start off! A bit of background. The reason why I’ve created these scripts is that many of my customers (regardless of using ConfigMgr or Intune to manage Windows as a Service (WaaS) are asking for a automated solution to build deployment rings and support a continuous application testing (reactive testing, fail-fast etc). With these scripts I also want to create a better understanding a give organization a platform to start of from. I do not in anyway believe that its “one-size fits all”. It will of course depend on many different variables – but you should be able to re-write the scripts to suit your needs. If you would like any kind of input, let me know, I would be glad to help or give you advice for your organization.
The first script will create a number of AAD-groups that we later on will connect to a number of Upgrade plans that you need to configure manually in Intune today. I’ve suggested a couple of name and a naming convention, but this will change. I do get new input and ideas every day, but again – look at it as a way to start of. The script is pretty straight forward:
#Author: Simon Binder
#Blog: bindertech.se
#Twitter: @Bindertech
#Thanks to: @daltondhcp

#This script is supposed to run prior to the start of each now Windows 10 servicing upgrade. Remember to change the version name.

#Using Azure Automation
#Replace the -Name parameter with your Automation Account

#$Credential = Get-AutomationPSCredential -Name 'Global Admin'

Param(
[Parameter(Mandatory=$True,HelpMessage='Enter Windows 10 release number, for example 1709',Position=1)]
[string]$WindowsVersion

)

Connect-AzureAD

#Enter the Windows 10 version you want to deploy in $WindowsVersion. Change the names (or add additional rings) as you like, but remember to change any other corresponding scripts.

$WaaSGroups = "$WindowsVersion-SAC-T - Technical", "$WindowsVersion-SAC-T Compatibility", "$WindowsVersion-SAC-B - First Ring", "$WindowsVersion-SAC-B - Second Ring", "$WindowsVersion-Compatibility Issues", "$WindowsVersion-Self-Service Deferred"

foreach ($WaaSGroup in $WaaSGroups){

New-AzureADGroup -Description "$WaaSGroup" -DisplayName "$WaaSGroup" -SecurityEnabled $true -MailEnabled $false -MailNickName 'NotSet'

}
Roadmap (a selection of the improvements/changes planned):
- Migrate as much as possible to the Intune Graph language and when the necessary cmdlets comes available.
- Create a similar script for ConfigMgr.
- Support on-prem Active Directory.
- Add suggestions and alternative setups depending on environment, application and size of organization.
- Improve the automation level to more easily manage multiple concurrent Windows versions.
- Clean up script and optimize it for performance and automation.
You add your Windows-version to be able to differentiate between the different versions, and then it will create a number of groups. Of course, feel free to change the names.
When the groups have been created, you currently need to set up your Update Rings manually. Below Ill show you how to set up the first one – and after that I’ve provided you with a table with suggested settings for the additional rings. Configure these according to your needs – and let me know if you would like any input.
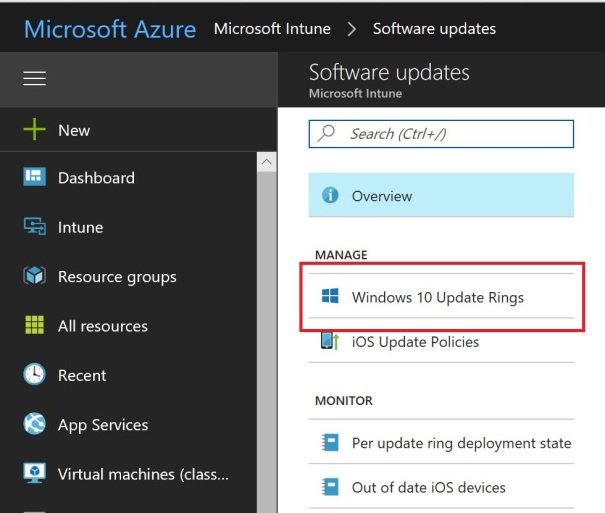
Begin by moving to the Software Updates blade of Intune:

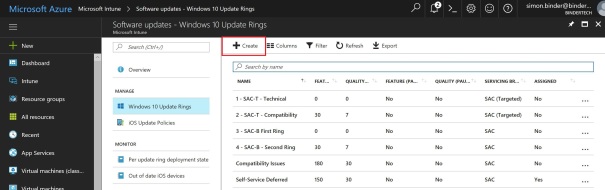
Choose Windows 10 Update Rings:
Click “Create”:
And configure the first ring according to screen shots below:


When the ring is configured you also need to assign it to the corresponding group that you created using the scripts, you’ll get a brief overview of how to do it below:


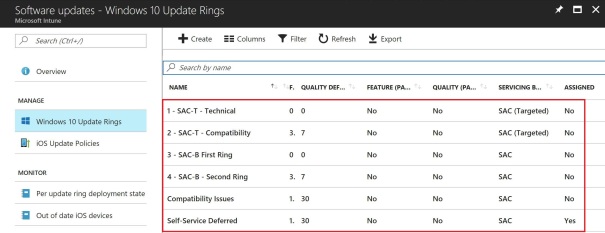
And then you repeat the process for each group. The suggested configuration follow below:

So, when all the updates rings are done and connected to their respective group its time to move on.
Enable Azure AD Group Self-Service
To enable self-service deferral (which I do recommend) we need to enable Self-Service AAD Group Management. In other words enable the user to add (and remove) its own user account from Azure AD Groups. Start by going to Azure Active Directory in the Azure portal:

The setting we are after is located under “User & Groups”:

Open Group settings and start configuring the settings:

Start by enabling “Self-service group management” and choose the groups (or groups) of user that should be able to use self-service. Its advisable to limit this, but in my case I’ve gone for the easiest (laziest) approach. Save the settings and you are basically done.

Now, to try out the new feature go to the MyApps-page and log on using your Azure AD credentials. The page will load and you’ll see a page similar to the page below. Click “Groups”.

You’ll end up on a page where you can view all the groups you are a member of, and also the groups you own. But we want to join a new group:

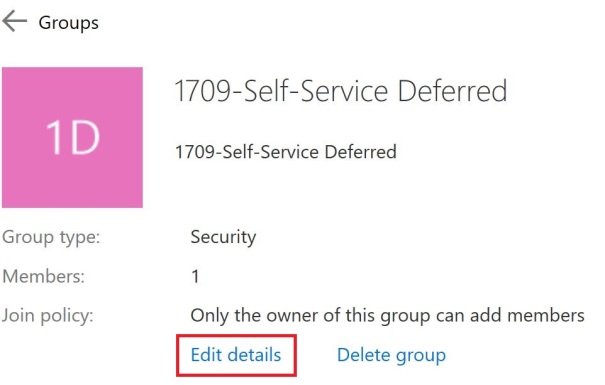
The first time you enter this page, you wont be able to join any of the groups. The group-owner (or a Azure AD admin) needs to enable self-service for a particular group. This is done by selecting the group you want to enable (in our case the Self-Service Deferred one) and click “Show more details”:

“Edit details”:
A new menu will open, and you can now choose how a user can get access. Either by letting anyone join without the need for approval – which probably could be a good test scenario (or if you like a permanent scenario) – or enable approval by the group owner.

Afterwards the “Join Group” button will be visible and your users (the once you have configured at least) will be able to join the group.
Azure Automation and scripts
Now we have a number of groups and we have enabled Self-service deferral (and self-service group management) and now its time to automate! Currently its achieved by two scripts. One that populates the rings based on group membership (SAC-T) or at random (SAC-B) and one script to drive the self-service management.
One of the (and probably one of the easiest & coolest) ways to schedule the scripts is to use Azure Automation.
We’ll (as always) start of in the Azure portal, and add the service to our tenant. Click “New” and search for “Automation”:


When you’ve found the correct solution, click “Create” and fill in the settings to suit your environment. In most cases, you could probably leave all the settings at default and just give the account a fancy name:

The automation account will be configured and the Run As accounts created. When its done, you’ll get a notification from the portal and you can reach your new automation solution using the “Go to Resource” button:

When you’ve reached Azure Automation we need to add some Shared Resources: Credentials, a schedule and also an additional PowerShell module. You’ll find these further down in the menu to the left:


Click each of the resources and choose “Add a schedule”, “Add a module”, and “Add a credential respectively”.
The settings should of course be adapted to your business needs, and they may be necessary to change due to a larger or smaller environment. In this case I’ll create two schedules. One for the population of the groups that will run once every 24 hours and one for Self-Service that will run once every hour. Lastly, I’ve added an administrative account to run the runbooks that includes the scripts. In my case I’ve used my own personal account, but the recommendation is to use a account configured for Azure Automation and with the least amount of privileges necessary.


To be more flexible, you should also create a variable to add the version number for the Windows 10 release you wish to upgrade to. This is done under “Variables” and is also pretty straight forward. Just click “Add a variable” and enter Name (WindowsVersion), Type (String) and Value (1709).

Lastly, we also need to add the Azure AD PowerShell module to the automation account. This is done in the “Modules” menu and you start by clicking “Browse gallery”. For my scripts you only need the Azure AD module, which you find if you search for “AzureAD”. You could of course add the “AzureADPreview” module as well to get the coolest new features, but its not required today. Just click the module to add it, choose “Import” and lastly click “OK”. The module will be installed and will load automatically when we run our script shortly.


Now, lets head back to the main page of the Automation Account. Its time to create our Runbooks that will include our scripts. Click the menu-button to start and “Add a runbook” to start the creation:

In the new blade that opens, choose to “Quick Create” a new runbook. Give the runbook a suitable name and choose “PowerShell” as the runbook type – then click “Create”:

When the runbook has been create, you’ll be taken straight into it and end up in the “Edit PowerShell Runbook” tool. Its very empty to start of with, so copy the first script into the scripting window.
Remember to:
- Enable the part of the script used for Azure automation and disable the part for manual use.
- If you have decided to name your variable or credentials to something other than what is predefined in the script, you need to change this in the script.
When you are done, click “Save” and after that “Test pane” its time to see if the copy-paste action was done correctly, that the credentials are working and that you have enable the correct lines for authentication.

In the Test pane you run the script by hitting “Start” and hold your thumbs. You’ll see the script change status from “Queued” to “Starting” to “Running” to (hopefully) “Completed” and you will probably get an output similar to mine below:

Now, close the Test pane and click “Publish” on the Edit page. Go back to your runbook and choose “Schedule”
Link the hourly schedule you create earlier to this runbook and click OK.


Now when the first runbook is done, repeat the process for the second script, but this time use the daily schedule. When both are done, you can either wait for the schedule to kick in, or run them manually by clicking the “Start” button on the first page of the runbook.

The scripts
So, now when we are done with the setup, its time to go through how the scripts work and a brief roadmap for each.
#Author: Simon Binder
#Blog: bindertech.se
#Twitter: @Bindertech
#Thanks to: @daltondhcp

<#Using Azure Automation #Replace both the -Name values to suit your environment. $Credential = Get-AutomationPSCredential -Name 'Global Admin' $WindowsVersion = Get-AutomationVariable -Name 'WindowsVersion' Connect-AzureAD -Credential $Credential #>

#Run manually

Param(
[Parameter(Mandatory=$True,HelpMessage='Enter Windows 10 release number, for example 1709',Position=1)]
[string]$WindowsVersion

)

#Sets variable for WaaS-groups, Device & User Members of the Self-Service group.

#Sets the Self-Service Group in Script. Remove # from the rows below to enable prompting for group name (Not recommended)

$group = Get-AzureADGroup -SearchString "$WindowsVersion-Self-Service Deferred" | Select-Object -ExpandProperty ObjectID
#$groupname = Read-Host -Prompt 'Input group name'
#$group = Get-AzureADGroup -SearchString $groupname | Select-Object -ExpandProperty ObjectID

$WaaSGroups = Get-AzureADGroup -SearchString "$WindowsVersion-SAC" | Select-Object -ExpandProperty ObjectID
$DeviceMembers = Get-AzureADGroupMember -ObjectId $group -All:$True | Where-Object {$_.ObjectType -eq 'Device'}
$users = Get-AzureADGroupMember -ObjectId $group -All:$True | Where-Object {$_.ObjectType -eq 'User'} | Get-AzureADUser | Select-Object -ExpandProperty UserPrincipalName

#Gets all Windows-devices that have each user-member as owner.
#If they already are members they will be skipt and if not the devices will be added to the group

foreach ($user in $users){

$devices = Get-AzureADUserOwnedDevice -ObjectId $user | Where-Object {$_.DeviceOSType -eq 'Windows'} | Select-Object -ExpandProperty ObjectID
foreach ($device in $devices){

if ($DeviceMembers -match $device){

('{0} is already a member of the group' -f $Device)

}

Else{

Add-AzureADGroupMember -ObjectId $group -RefObjectId $device

}

}

}

#Gets all deferred devices from users in the group and check if they are members of any other WaaS-group. If so, they are removed.

$deferreddevices= $Users | ForEach-Object{

Get-AzureADUserOwnedDevice -ObjectId $user | Where-Object {$_.DeviceOSType -eq 'Windows'} | Select-Object -ExpandProperty ObjectID

}

foreach ($deferreddevice in $deferreddevices){

foreach ($WaaSGroup in $WaaSGroups){

$WaaSMember = Get-AzureADGroupMember -ObjectId $WaaSgroup -All:$True | Where-Object {$_.ObjectType -eq 'Device'} | Select-Object -ExpandProperty ObjectID

if ($deferreddevice -in $WaaSMember){

Remove-AzureADGroupMember -ObjectId $WaaSGroup -MemberId $deferreddevice
}

}
}

#Gets all devices in the group and compares to the deferred devices. If a device is member, but not have its user in the group, its removed.

foreach ($DeviceMember in $DeviceMembers){

$MemberObjectID = ($Devicemember | Select-Object -ExpandProperty ObjectID )

if ($MemberObjectID -notin $deferreddevices){

Remove-AzureADGroupMember -ObjectId $group -MemberId $MemberObjectID
#If you want to re-add previously deferred machines to a specific group enable the lines below
#Add-AzureADGroupMember -ObjectId $RestoreGroup
}

}
The self-service script is actually pretty straight forward. It gets the self-service deferral group and when that’s done its also gathers to other groups used for WaaS as well as the user and device members of the deferral group.
The next step is to get all the (Windows) devices that belongs to each user member of the group. This is done due the limitation that a user cant add their devices to a particular group by themselves. If the device is not already a member of the group it will be added.
When that’s done, we also need to remove the deferred devices from the other WaaS groups. And also the opposite is done, if a device is a member of the deferral group, but its owner isn’t, its remove. At this point, its possible to enable a restore-action to another group, but currently that’s not activated and is in parts done by the other script in this post (Populate_WaaS_Groups.ps1)
Roadmap (a selection of the improvements/changes planned):
- Migrate us much as possible to the Intune Graph language as possible and when the necessary cmdlets comes available.
- Create a similar script for ConfigMgr.
- Support on-prem Active Directory.
- Improve the script function/automation to run on demand when a user is added or removed.
- Improve the automation level to more easily manage multiple concurrent Windows versions.
- Clean up script and optimize it for performance and automation.
</span>

#Author: Simon Binder
#Blog: bindertech.se
#Twitter: @Bindertech
#Thanks to: @daltondhcp

<#Using Azure Automation
#Replace both the -Name values to suit your environment.

$Credential = Get-AutomationPSCredential -Name 'Global Admin'
$WindowsVersion = Get-AutomationVariable -Name 'WindowsVersion'
Connect-AzureAD -Credential $Credential
#>

#Run manually

Param(
[Parameter(Mandatory=$True,HelpMessage='Enter Windows 10 release number, for example 1709',Position=1)]
[string]$WindowsVersion

)

#Sets a bunch of variables. Assumes that you have run the Create_WaaS_Group.ps1 script first.
#Else, change names according to your organizations standard.

$devices = Get-AzureADDevice -All:$True | Where-Object {$_.DeviceOSType -eq 'Windows'} | Select-Object -ExpandProperty ObjectID
$AppGroups = Get-AzureADGroup -SearchString 'App-' | Select-Object -ExpandProperty ObjectID
$SACTGroup = Get-AzureADGroup -SearchString "$WindowsVersion-SAC-T Compatibility" | Select-Object -ExpandProperty ObjectID
$SACBGroups = Get-AzureADGroup -SearchString "$WindowsVersion-SAC-B" | Select-Object -ExpandProperty ObjectID
$WaaSGroups = Get-AzureADGroup -SearchString "$WindowsVersion-SAC" | Select-Object -ExpandProperty ObjectID
$DeferralGroups = ((Get-AzureADGroup -SearchString "$WindowsVersion-Compatibility" | Select-Object -ExpandProperty ObjectID)), ((Get-AzureADGroup -SearchString "$WindowsVersion-Self-Service" | Select-Object -ExpandProperty ObjectID))

#Gets all devices in the groups used for Deferral

$DeferredDevices = foreach ($Deferralgroup in $Deferralgroups){

Get-AzureADGroupMember -ObjectId $Deferralgroup | Where-Object {$_.ObjectType -eq 'Device'}
}

#Gets all devices already in any of the groups used for Windows Servicing

$MemberDevices = foreach ($WaaSGroup in $WaaSGroups){

Get-AzureADGroupMember -ObjectId $WaaSGroup | Where-Object {$_.ObjectType -eq 'Device'}

}

#Gets all devices already in the Compatibibility group

$ExistingSACTMembers = Get-AzureADGroupMember -ObjectId $SACTGroup | Where-Object {$_.ObjectType -eq 'Device'} | Select-Object -ExpandProperty ObjectID

#Populates the Semi Annual Channel Targeted Group buy looking for all groups used for application assignments.
#Members are then choosen randomly.

$SACTMembers = @()
foreach ($AppGroup in $AppGroups) {

$UserMembers = Get-AzureADGroupMember -ObjectId $AppGroup | Where-Object {$_.ObjectType -eq 'User'}
$PossibleDevices = @()
foreach ($UserMember in $UserMembers) {

$ObjectID = $UserMember.ObjectId
$WIndowsDevices = @(Get-AzureADUserOwnedDevice -ObjectId $ObjectID | Where-Object {$_.DeviceOSType -eq 'Windows'} | Select-Object -ExpandProperty ObjectID)

foreach ($WindowsDevice in $WindowsDevices) {

if ($WindowsDevice -notin $DeferredDevices.ObjectID){

$PossibleDevices += $WindowsDevice
}
}

}

$UserDevice = $PossibleDevices | Get-Random
$DeviceMember = Get-AzureADGroupMember -ObjectId $AppGroup | Where-Object {$_.ObjectType -eq 'Device'} | Where-Object {$_.DeviceOSType -eq 'Windows'} | Get-Random | Select-Object -ExpandProperty ObjectID
$AllDevices = $UserDevice, $DeviceMember
$SACTMembers += $AllDevices | Get-Random

}

foreach ($SACTMember in $SACTMembers) {

if ($ExistingSACTMembers -match $SACTMember){

("$SACTMember is already a member of the SAC-T group")

}
Else {

Add-AzureADGroupMember -ObjectId $SACTGroup -RefObjectId $SACTMember

}
}

#AssignedDevices gathers all devices already assigned to a Windows Servicing group,
#to later be able to exclude them from other groups, or from being added a second time.

$AssignedDevices = $DeferredDevices.ObjectID, $MemberDevices.ObjectID

#Adds the remaining/new Windows devices to the different Semi Annual Channel Broadly groups at random.

foreach ($device in $devices) {

if ($AssignedDevices -match $device){

("$Device is already a member of a SAC-B or deferral Group")

}

Else {

Add-AzureADGroupMember -ObjectId ($SACBGroups | Get-Random) -RefObjectId $device

}
}
The second script demands a bit more logic. At first many of the variables are the same, but we need number of variables for different kinds of groups and/or devices.
The purpose of the script is to populate a group for compatibility test earlier in the WaaS-cycle. To achieve that all the groups used for app/application-distribution needs to have a prefix (of course configurable) so that its easy to differentiate them from other security groups. The script then looks for users in all the groups (and/or devices) and at random chooses one device from each group and adds it to the compatibility group.
It then distributes the remaining devices (that are not in any of the SAC-T och deferral groups) evenly between the SAC-B groups.
Its an easy way to achieve the goal, but will need some additional TLC moving forward.
Roadmap (a selection of the improvements/changes planned):
- Migrate us much as possible to the Intune Graph language as possible and when the necessary cmdlets comes available.
- Create a similar script for ConfigMgr.
- Support on-prem Active Directory.
- Improve the logic to be able to add additional parameters to spread the devices more evenly.
- Add logic to also include devices based on HW-inventory etc.
- Improve the automation level to more easily manage multiple concurrent Windows versions.
- Clean up script and optimize it for performance and automation.
And for the entire “Suite” it is to automate the setup of Azure Automation, setup of Azure AD, creation of Software Update Rings and in general offer a “complete” solution. It’s also vital to be able to provide recommendations on timings, test approach, ring design etc. I would gladly receive your feedback on this, what do you want to see?
This has been a long post – but I wanted to at least start of from here and you’ll get regular updates to the “suite” as time progresses and new possibilities opens up.
A special thanks to @daltondhcp (Johan Dahlbom) and @David_Das_Neves (David das Neves) for inspiration and scripting. Also a thank you to my colleague Daniel G Johansson for help with some of the logic 🙂
Some additional resources that could be handy:
From my own blog:
Special Episode 2 – Windows as a Service
Windows as a Service – User responsibility and interaction
What you need to do if you want to adopt Windows as a Service
From Microsoft:
#WaasInANutshell – by Michael Niehaus
From David das Neves:
Automating Windows as a Service
Official rings and asking for feedback
As a Solution Architect, Simon inspires customers, partners and colleagues to create the best possible workplace for their users. His main focus is the Windows platform – but todays workplace consists of so much more than that. As an MCT he is passionate about teaching and sharing knowledge. He’s a frequent speaker, blogger and podcaster – as well as a penguin fanatic.


[…] Before the release of the “complete” solution, ill assume that you have a basic knowledge of Azure Automation, Powershell and Intune – and wont go into detail into how you configure and setup the different solutions – that information will be added later. However, ill of course point out the vital parts, and you can find all the step-by-step guides you need in my previous post: Configure and manage Windows Servicing with Microsoft Intune […]
[…] week and new tool! This is the remake of an older script that you can read about here (and also where you’ll get instructions on how to get started with Azure Automation – […]